

Contact form
This tutorial will walk you through how to create a basic contact form, that generates a pdf, sends it as an attachment in an email to an address of your choosing and finally embed it on a web page.
Prerequisites
Section titled “Prerequisites”- Email application
- Forms application
Credentials for the email plugin setup and tested.
1. Creating a project
Section titled “1. Creating a project”Create a new project and name it Contact form, no need to fill in the description unless you want to. Note that Start is already in place on the canvas after the project has been created.
2. Building the graph
Section titled “2. Building the graph”A. form
Section titled “A. form”-
Drag the form application onto the canvas and select the form vertex.
-
Enter form config
To enter the forms config, press the cogwheel on the form vertex The initial example will show a registration form, but let’s change that so the text reflects what we actually want.
-
Edit the form
Now it’s time to edit the form to reflect the changes we would like. We will start with the initial example
Registration formand change some minor things, like name, id etc. But we will also add a subject-field.In the diff in the example you can see what changes were done as well as copy paste the complete example code.
At the bottom left of the editor you can find the current documentation from the application. The documenation is also available on the applications GitHub
Click to expand example config
{"id": "contact_form","defaultTheme": "light","computed": {},"children": [{"type": "heading","id": "title","text": "Contact us","level": 1},{"type": "field","id": "name","label": "Full Name","outputSignal": true,"required": true,"input": {"type": "text"}},{"type": "field","id": "email","label": "Email","outputSignal": true,"required": true,"input": {"type": "text","variant": "email"}},{"type": "field","id": "subject","label": "Subject","outputSignal": true,"required": true,"input": {"type": "text"}},{"type": "field","id": "message","required": true,"outputSignal": true,"label": "Message","input": {"type": "textarea"}},{"type": "button","id": "submit","text": "Send message","action": "submit"}]}{"id": "contact_form","id": "register_form","defaultTheme": "light","computed": {},"children": [{"type": "heading","id": "title","text": "Contact us","text": "Register","level": 1},{"type": "field","id": "name","label": "Full Name","outputSignal": true,"required": true,"input": {"type": "text"}},{"type": "field","id": "email","label": "Email","outputSignal": true,"required": true,"input": {"type": "text","variant": "email"}},{"type": "field","id": "subject","label": "Subject","outputSignal": true,"required": true,"input": {"type": "text"}},{"type": "field","id": "message","required": true,"label": "Message","outputSignal": true,"input": {"type": "textarea"}},{"type": "button","id": "submit","text": "Send message","text": "Submit","action": "submit"}]}For now we wont’ do any changes to the styling.
-
Output formdata for pdf generation
Now we want to enable pdf export. In the menu to the left of the editor below the
{ }there is a document icon. Press that and change to the following{"enabled": true,"paper": "A4"} -
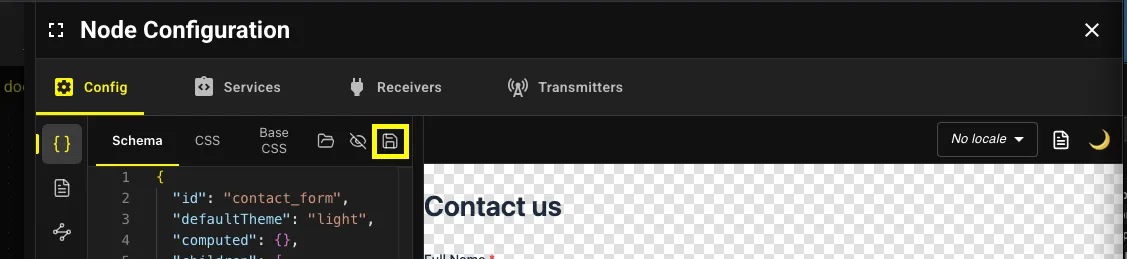
Save To save the form usual keyboard shortcuts works. But you can also press the save icon highlighted in the picture
B. PDF generation
Section titled “B. PDF generation”-
Canvas
To generate a pdf we need to drag out the forms application on the canvas and select the
Generate pdfvertex instead. -
Connect
Connect form to generate pdf by draggin from the success transmitter to the input receiver on the
Generate pdfvertex and press the cogwheel to enter config -
Bind signal
Bind the output from the form to that vertex. By selecting the
Form >> PDF signalin thePDF Source.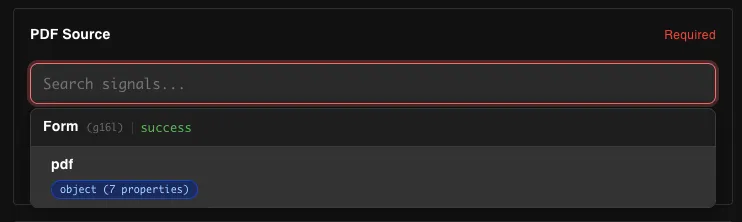
If you want you can play around with other settings as well.
-
Save
Save the config by pressing save at the bottom or simply using normal keyboard shortcuts and then close the config
C. Send email
Section titled “C. Send email”-
Canvas
Drag out the email application onto the canvas and select send email.
-
Connect
Connect the pdf generator to the send email vertex after that press the cogwheel on the send email vertex.
-
Config
Before styling the email let’s add bind signals as well as add the text variables.
In the menu of the plugin, press the branch icon and bind the signals one by one by pressing the
+sign and bind the following signals from the form.- name
- message
- subject
Now lets add the following email text variables below the area where we bind the signals
Click to expand example email text
{"en": {"subject": "New contact inquiry","subjectPrefix": "New inquiry from","preview": "New message from","hero": "New contact inquiry","intro": "Someone just reached out through your contact form. Their details and message are below.","detailsTitle": "Sender details","nameLabel": "Name","emailLabel": "Email","messageTitle": "Message","cta": "Reply to","footer": "You're receiving this because you're listed as a recipient for contact form submissions.","copyright": "© 2026 Your Company. All rights reserved."}}Lets move on to the actual email instead. If you have copied the exact codes above and used the same ids in your form simply pasting the below code in the email editor will work flawlessly.
Click to expand example email
import {Html,Head,Body,Container,Section,Text,Button,Hr,Preview,} from '@react-email/components';export default function Email() {return (<Html lang={"[[ locale ]]"} dir="ltr"><Head><title>[[ t.subject ]]</title><meta name="viewport" content="width=device-width, initial-scale=1" /><meta httpEquiv="X-UA-Compatible" content="IE=edge" /><meta name="color-scheme" content="light" /><meta name="supported-color-schemes" content="light" /></Head><Preview>[[ t.preview + " " + inputs.name ]]</Preview><Body style={main}><Container style={container}><Section style={hero}>[[ has(inputs.subject) ? Badge(inputs.subject) : "" ]]<Text style={heading}>[[ t.hero ]]</Text><Text style={heroText}>[[ t.intro ]]</Text></Section><Section style={content}><Text style={sectionTitle}>[[ t.detailsTitle ]]</Text><Section style={detailsCard}><Section style={field}><Text style={fieldLabel}>[[ t.nameLabel ]]</Text><Text style={fieldValue}>[[ inputs.name ]]</Text></Section><Section style={field}><Text style={fieldLabel}>[[ t.emailLabel ]]</Text><Text style={fieldValue}>[[ inputs.email ]]</Text></Section></Section></Section><Section style={content}><Text style={sectionTitle}>[[ t.messageTitle ]]</Text><Section style={messageBox}><Text style={messageText}>[[ inputs.message ]]</Text></Section></Section><Section style={ctaBox}><Button href={"[[ 'mailto:' + inputs.email ]]"} style={cta}>[[ t.cta + " " + inputs.name ]]</Button></Section><Hr style={divider} /><Section style={footerSection}><Text style={footer}>[[ t.footer ]]</Text><Text style={muted}>[[ t.copyright ]]</Text></Section></Container></Body></Html>);}export function Field() {return (<Section style={field}><Text style={fieldLabel}>[[ args[0] ]]</Text><Text style={fieldValue}>[[ args[1] ]]</Text></Section>);}export function Badge() {return <Text style={badge}>[[ args[0] ]]</Text>;}const main = {backgroundColor: '#f4f4f7',fontFamily: '-apple-system, BlinkMacSystemFont, "Segoe UI", Roboto, sans-serif',};const container = {maxWidth: '560px',margin: '40px auto',backgroundColor: '#ffffff',};const hero = {backgroundColor: '#111827',padding: '44px 40px',textAlign: 'center' as const,};const badge = {display: 'inline-block',backgroundColor: '#312e81',color: '#c7d2fe',fontSize: '11px',fontWeight: 'bold',letterSpacing: '0.08em',textTransform: 'uppercase' as const,padding: '4px 12px',borderRadius: '999px',margin: '0 0 16px',};const heading = {color: '#ffffff',fontSize: '26px',fontWeight: 'bold',margin: '0 0 12px',lineHeight: '1.2',};const heroText = {color: '#9ca3af',fontSize: '15px',lineHeight: '1.6',margin: '0',};const content = {padding: '32px 40px 0',};const sectionTitle = {fontSize: '17px',fontWeight: 'bold',color: '#111827',margin: '0 0 16px',};const detailsCard = {backgroundColor: '#f9fafb',borderRadius: '8px',padding: '8px 24px',};const field = {padding: '12px 0',borderBottom: '1px solid #eef0f3',};const fieldLabel = {fontSize: '11px',fontWeight: 'bold',color: '#6b7280',letterSpacing: '0.06em',textTransform: 'uppercase' as const,margin: '0 0 2px',};const fieldValue = {fontSize: '15px',color: '#111827',margin: '0',wordBreak: 'break-word' as const,};const messageBox = {borderLeft: '3px solid #6366f1',backgroundColor: '#f9fafb',borderRadius: '0 8px 8px 0',padding: '20px 24px',};const messageText = {fontSize: '15px',color: '#374151',lineHeight: '1.65',margin: '0',whiteSpace: 'pre-wrap' as const,};const ctaBox = {padding: '32px 40px 40px',textAlign: 'center' as const,};const cta = {backgroundColor: '#6366f1',color: '#ffffff',padding: '14px 28px',borderRadius: '6px',fontSize: '15px',fontWeight: 'bold',textDecoration: 'none',};const divider = {borderColor: '#e5e7eb',margin: '0 40px',};const footerSection = {padding: '24px 40px 32px',};const footer = {fontSize: '13px',color: '#9ca3af',lineHeight: '1.5',margin: '0 0 8px',};const muted = {fontSize: '12px',color: '#d1d5db',margin: '0',};Now there is one final step to solve before testing the complete workflow. We need to send the email somewhere. Press the envelope in the menu and add a sender. Type in your own email as the to address, then attach the pdf by copying the following into attachments.
[inputs.pdf] -
Save
Press the save button in the bottom right corner or use standard keyboard shortcuts to save.
3. Lets play
Section titled “3. Lets play”Now press the green play button at the bottom of the canvas and then press Run test at the top right corner.
Fill in the form and verify that everything works as expected before moving on to the next step.
4. Publish project
Section titled “4. Publish project”When you have reached this step it means that the project is working and you want to publish your project and move on to the next step.
You can publish a project by pressing the upload icon on the menu bar on the bottom of the canvas. If you are missing a deployment group you will be faced with a form where you are required to create one. Just fill in a name and description that seems fitting.
If you already have one or more select one from the drop down or simple press + to create a new one.
Press Publish when you are ready to move on the the final step.
5. Embedding the project
Section titled “5. Embedding the project”Now we need to embed the form somewhere. In this tutorial I will simply create a jsfiddle and embed it there, but you are of course free to embed the deployment wherever you want.
Go to the Deployments page in mochabug Adapt, then select the deployment group and the deployment you just created. By default it has no whitelisted domains and requires authentication. But this is a contact form we want to embed.
Press the cogwheel in the top right corner and let’s change settings in Access control. Add the following on Allowed origins
https://*.jsfiddle.net/, https://*.jshell.netAnd disable authentication required. I’ll leave Proof of Work required enabled to mitigate spam from bots.
Lets save a close settings, and instead press < > GET CODE, select HTML as frameworkd and simply copy the code and paste it in jsfiddle.
Press Run in jsfiddle and take a look at the result, test run it to make sure it works as expected.
6. Republishing a project
Section titled “6. Republishing a project”After some time you might feel that you would like to do some changes to the project itself, now let’s head back to the project and just change the title in the form from Contact us to something different, save the form node and press publish again.
Head back to jsfiddle your current active session will still run on the old version to make sure you can do changes without downtime. But if you were to press run again in fiddle the changes will be visible.
In the deployment section on the deployment itself you can see active sessions, what versions they are running and even stop live sessions if needed.
Good job, you have just created a simple contact form that generates a pdf from the form and sends an email with the attachment to an adress of your choosing now head back to Tutorials for more inspiring examples.